BLOG 13
Inspired by defying gravity
Or:
Why I started using rigs and post-production
In March 2017 I had built a shed set in my spare room and upgraded the Bitz puppet. I tried to use my limited experiences to make a puppet that would (in theory…) be able to run, jump and fall. To be able to attempt these movements, I would need to do something I had not done before - use a stop-motion rig and remove it in post-production. As with all my animation, I stumbled my way through it…. Before you read about me doing it badly, here’s a short video from Laika studios and their use of rigs on the wonderful film ParaNorman.
Firstly, animating with a rig. A basic rig is a ball jointed arm with a weighted base plate. The arm end attaches to your puppet, allowing you to animate in ‘gravity defying’ ways. I had to try to attach the rig to the Bitz puppet, which was tricky as the puppet was made from junk. The main connection point between the rig and Bitz was UTB (Up The Bum), via a hole in the cork used to make the hips. I also had a crocodile clip attachment on the rig, which allowed me to use the rig to take the weight of the puppet from various improvised positions. I also used additional weights and bits of cardboard to achieve the puppet positions needed. In addition to the rig on the main puppet, I also used a rig for the bouncing ball and a small wire rig for the spider…
Some unedited shots of Bitz with the rig in view
Secondly, removing the rig. I don’t use green screen. My approach, in simple terms, is to take a photo of the set without the puppet in it. I then animate the sequence with the puppet and rig. The animation can then be overlaid on the background image using film editing software (such as After Effects), or frame by frame using photo editing software (such as Photoshop). The rig part of the image can be deleted. However it is NEVER this simple… there are loads of errors in this process that make the final composite look terrible. I personally like to use the frame-by-frame approach, as it helps with the one major issue - shadows.
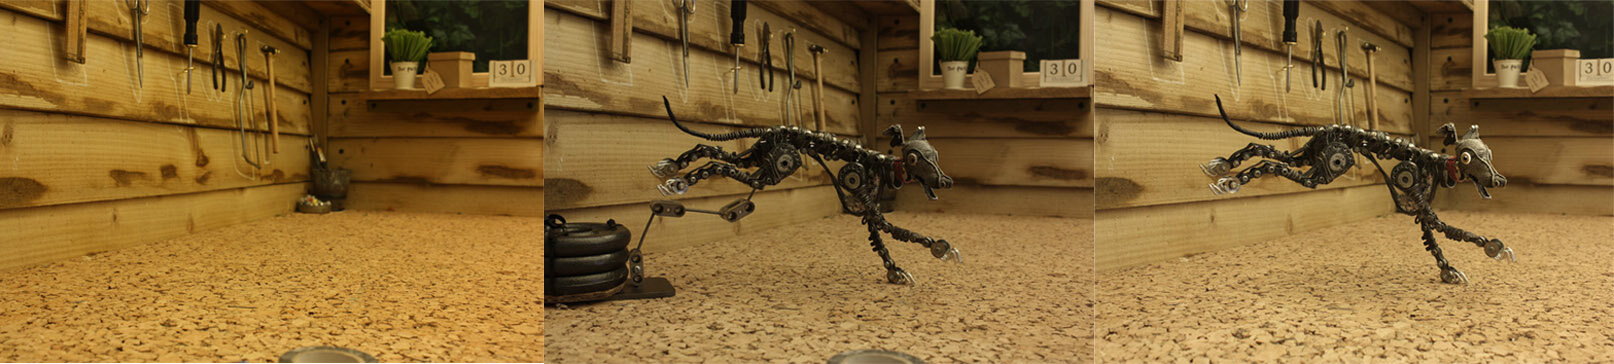
Background. Puppet with rig. Rig removed.
Shadows. Just removing the rig is one thing. Making it so the viewer doesn’t realise it was ever there is another. The main issue is the shadow on the floor, cast by the rig and the puppet. When the rig is edited out you will be left with a harsh unnatural edge, ruining the illusion. In addition to this, both the puppet and the rig will cast shadows onto the set, which may show up as harsh edges when overlaid onto the background image - which will also ruin the illusion that the puppet is moving around the space.
I had to do a lot of tests and experiments with lighting set-ups and editing techniques to achieve anything close to the results I wanted. I used photoshop to edit out and add in different elements frame-by-frame, replaying the frames through Dragonframe to refine the results. I found the approach needed to get the right result was different for each sequence. It’s difficult to explain the techniques here, but I tried to arm myself with various different skills and options to take forward into proper filming. The tests weren’t perfect but I just had to go for it and start animating in ernest... I just had to trust that the rig could be adequately removed. I edited the sequences as they were filmed, gaining skills and confidence as I went along.

Animating a Jumping Bitz with a rig UTB and legs taped down, balancing on 6 layers of cardboard held down with 3 weights.
I attempted some ambitious movements with the Bitz puppet, but the reality was that I was pretty out my depth with most of these… but, like all my work, I was challenging myself, learning ‘on the job’ and working to a deadline. Whatever happened there would be a film in 3 months ready to enter into the Manchester Animation Festival.
In the next blog, I’ll revisit the other technical things I tried for the first time on this project and and chat about the chosen narrative and sequences of the ‘Bitz’ film.
Thanks for reading!
Best wishes
James
CURRENT WORK
* FILM PRODUCTION* I am currently in the tentative early stages of planning ‘Whibbits! Rox Episode’. I have a rough idea and I’m making some notes and looking for reference material (both dog and none-dog related), I’ll reveal more about this if I make the fundraising target, which is currently at 85%. Thanks to everyone who has got involved so far! If you haven't yet, check out my shop page to help bring Rox to life!

*MODEL MAKING* I am have designed the prototype for an all black (with a little grey and white) whibbit called ‘Tux’ (His name comes from tuxedo). This one is for me to hopefully animate with (eventually), with 5 more available to pre-order. There are 4 left, so if you want to give Tux a forever home you can order one from my shop page.

*MERCHANDISE/FUNDRAISING* As my latest animation is finished I am using related Merchandise to raise funds for the next stage of the whibbits project - The Rox Episode. I am running a raffle to win the actual Mory puppet used in his animation. THE DEADLINE TO GET RAFFLE TICKETS IS MIDNIGHT 4th MARCH (UK TIME)

I am also selling 4 types of badges and various supporters packs, with all proceeds going towards the next animation. I can’t make the whibbits come to life without you, so visit the shop if you want to get involved!
